TUTORIAL
Created
28 May 2007
Updated
7 Mar 2017
WHAT IS DCRAW
DCRAW is a free distribution RAW developer coded by David Coffin which supports and endless list of RAW formats expanding continuously. In words from the author: "So here is my mission: write and maintain an ANSI C program that decodes any raw image from any digital camera on any computer running any operating system". And so far he has achieved that.DCRAW works in Linux so as in Windows and Mac. In this tutorial we will make use of the Windows version although it will work exactly the same way in the other two platforms since DCRAW has no graphic user interface being a 100% command line application.
DCRAW requires no installation, just copy the executable file into the appropiate pathname and invoque it from a terminal console.
There are several front-end interfaces that make DCRAW more easy to use such as UFRAW, although in my opinion they lack of that extra of power and flexibility that DCRAW provides for not presenting to the user all its options in a straightforward way. In addition to this it is usual that a new feature or improvement appears every month, so any front-end gets quickly old fashioned. Mi advice: to learn how to use straight DCRAW.
DCRAW alone is not a friendly tool and because of this could not be ideal for your usual workflow. However thanks to the transparency and power of its low level control, it becomes the perfect tool to perform tricky RAW developments in specific cases such as:
- Technical analyses and studies
- Specially tricky to develop photographs
- Comparision between RAW developers
It is the only RAW developer I have found up to now that transmits the certainty of being performing on my RAW files exactly what I want to be applied to them and not what the RAW developer wants to; in fact as we will see it can do things that are out of reach in other more popular commercial RAW processors such as Adobe Camera Raw.
You will learn a lot about RAW theory and sensor linearity when using DCRAW. It is a piece of software that makes you feel very close to your RAW data.
DCRAW DOWNLOAD AND INSTALLATION
In the following link a Windows build of the last version of DCRAW can be found: Centro Studi Progresso Fotografico.Windows DCRAW versions require no installation since they consist of just a single compact .exe console application file. This file is named dcraw.exe and can be directly copied in the C:\WINDOWS\ path to be accesible from any folder when it is called in the command line.
HOW TO RUN DCRAW
DCRAW is executed from the command line in a MS-DOS window. To open an MS-DOS window go to Start → Execute and type cmd. A window with a black background will pop up and we will type dcraw on it so that DCRAW will display all available options: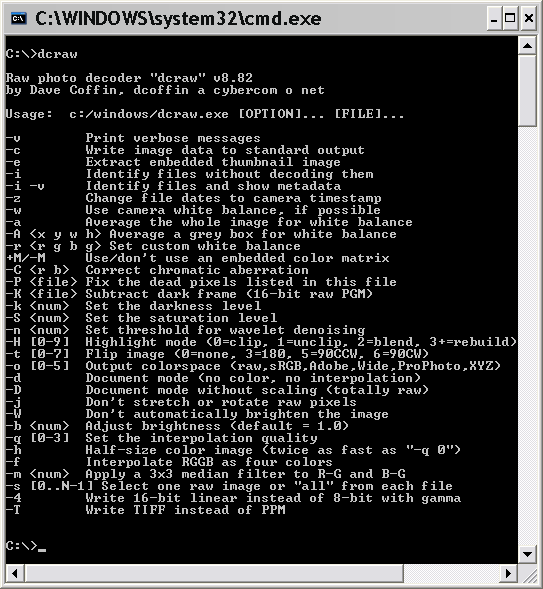
Fig. 1 Command line displaying all DCRAW v8.82's available options.
In a real example of execution of DCRAW over an hypothetic RAW file named photo.cr2, we would open the former command line window, we would move to the folder containing the file (the CD command allows to move through our hard disk's folders) and we would type something like:
C:\>dcraw -v -w -H 1 -o 0 -q 3 -4 -T photo.cr2
DCRAW would display the following messages:
   Loading Canon EOS 350D DIGITAL image from photo.cr2 ...

   Scaling with black 256, multipliers 0.586287 0.421032 1.000000 0.421032

   AHD interpolation...

   Building histograms...

   Writing data to foto.tiff ...


   C:\>
Storing the result of the RAW development in the file photo.tiff.
DCRAW OPTIONS
As we saw in the previous section DCRAW has multiple options for which a description can be found in David Coffin's manpage. I will only go through the options I consider more interesting for high quality RAW development. Options are used writing single letters preceded by a dash symbol after the dcraw command, and are:-v
Provides textual information about the RAW development process (recommended).
-e
Extracts the JPEG embedded in the RAW file, i.e. the JPEG file the camera generated for the camera display preview which differs from the JPEG file obtained when the camera is set in JPEG mode. It is a very quick way to get a JPEG view for all the RAW files contained in a folder. For instance doing: dcraw -e *.cr2.
-w
If DCRAW manages to find it, it will use the white balance that was adjusted in the camera at shooting.
-a
Performs an automatic white balance calculation over the whole image.
-r m1 m2 m3 m4
It sets a custom user white balance. These 4 values are the multipliers that will scale linearly all levels found in the RGBG channels in that order. The white balance means a scaling of image levels therefore all levels will move from their original positions which could not be desirable in certain cases. If we are not to perform any white balance we will use the option -r 1 1 1 1. We will study this feature more deeply later as it is a very important concept.
-H [0-9]
With this option we will set the highlight behaviour being allowed the following values: 0=clip, 1=no clip, 2=neutral grey blown areas, 3-9=highlight recovery. This feature will be also studied deeply in the white balance and highlights section. I mainly use the -H 0 option for its linearity and -H 2 when there is risk of blowing important parts of the image with the previous value. The -H 1 option guarantees that we will not blow any previously non blown channel but can lead to strange tones in the blown areas. The highlight recovery options are more sofisticated and slow down noticeably the execution speed.
-k n1 and -S n2
Respectively set the black and saturacion levels that will be used in the RAW development. Although it is best to let DCRAW calculate the black level, it is very interesting however to set the saturation level by ourselves for our particular camera with -S.
-D
Extracts an image with the pure RAW data without any demosaicing or scaling applied. It is very useful to analyse the real captured levels in the sensor's native range of 12, 14 or 16 bits.
-d
As the previous command, it does not perform any demosaicing but goes one step ahead in the development process since it adjusts black and saturation points, white balance and rescales to the output 16-bit range. It is very interesting to get linearized (for substracting the black point) undemosaiced data in a 16-bit scale with dcraw -d -r 1 1 1 1 that allows to obtain histograms in stops of exposure with Histogrammar. It can also be used to study the Bayer pattern of the RAW file, permitting for instance to detect malfunction in the camera sensor or individual anomalous pixels:
Fig. 2 Hot pixel detection over Bayer pattern (move mouse over).
-o [0-5]
Sets the output colour profile being possible the values: 0=none (no colour management), 1=sRGB, 2=AdobeRGB, 3=WideGamut, 4=ProPhoto, 5=XYZ. To convert to a colour space means a matrix transformation of the levels of the image and in some cases this could not be desirably. Not to perform any transformation we will use the option -o 0.
-q [0-3]
Sets the quality of the Bayer demosaicing algorithm employed. The more quality the more complex the algorithm will be and thus less quick, however DCRAW is very fast in all of them. Possible values are: 0=bilinear, 1=VNG, 2=PPG, 3=AHD. I always use the last value which is an adaptive algorithm providing very good results, although according to the author DCRAW will use by default the best algorithm for each camera model. In this way for Fuji cameras the method -q 2 is better than -q 3.
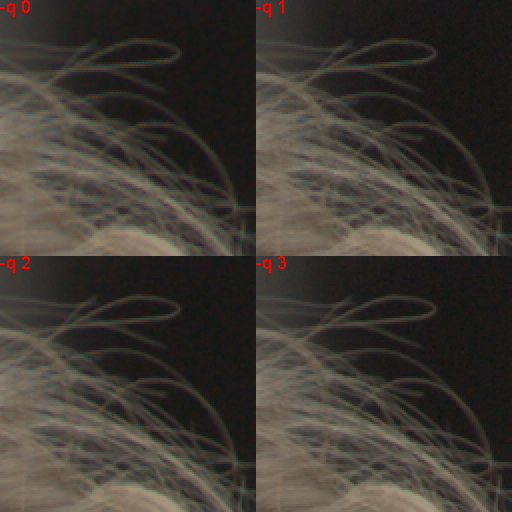
Fig. 3 Crops at 200% of different interpolation quality values.
-4
It generates a linear 16-bit file instead of an 8-bit gamma corrected file which is the default. I always use this option.
-T
It outputs a TIFF image file instead of PPM.
-g gamma slope
Applies a gamma correction to the output defined by the gamma value and the toe slope of the curve. For a pure gamma curve set slope to 0. Some typical values are:
-g 1 1 linear 1.0 gamma (default if -4 is used)
-g 2.2 0 pure 2.2 gamma (Adobe RGB)
-g 1.8 0 pure 1.8 gamma (ProPhoto RGB)
-g 2.4 12.9 sRGB gamma
-g 2.222 4.5 BT.709 specification gamma (default if -4 is not used)
With the descriptions seen so far we can now understand each of the parameters used in the example above
C:\>dcraw -v -w -H 1 -o 0 -q 3 -4 -T photo.cr2:-v Development showing the progress information on screen
-w We use the white balance that was configured in the camera
-H 1 We use a linear mode with no clipping in the highlights
-o 0 We do not convert the resulting image to any colour space
-q 3 We set the maximum possible quality of interpolation
-4 -T We force 16-bit TIFF linear output
LINEAR HISTOGRAM
If we make use of the -4 option the development will produce a 16-bit linear output. This is the mode to which I will refer in the rest of the tutorial since it is the mode that allows to take advantage of DCRAW's main strongholds. A linear development means that no gamma correction has been applied yet (typ. gamma=2.2), and thus levels are distributed along the histogram in a linear way being each of them proportional to the amount of light (number of photons) that the pixel was able to capture during the exposure.A linear image cannot be displayed due to its extreme darkness as the histogram is densely concentrated on the left side of the range, but as we will se later PS allows to display correctly this kind of images without altering its internal data.
To see what a linear histogram looks like let us take the following scene:
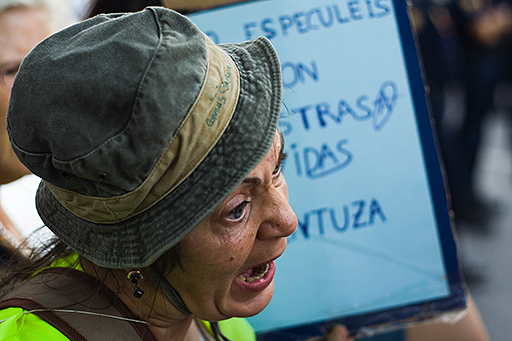
Fig. 4 RAW development sample image.
The previous photograph developed with a gamma correction would have the following histogram distribution:
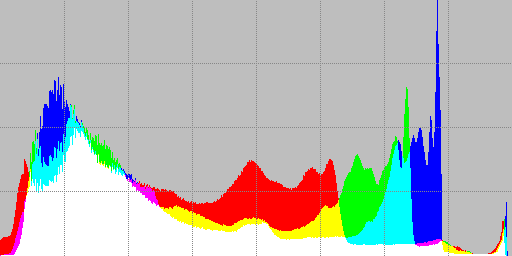
Fig. 5 Resulting histogram of gamma corrected development.
However when we develop it using DCRAW and the -4 option we get the following linear histogram:
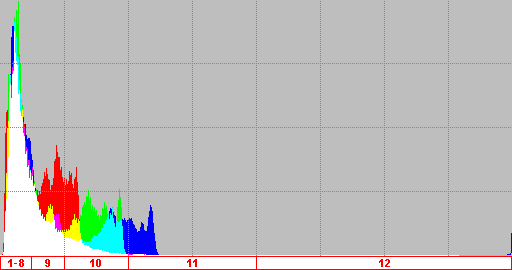
Fig. 6 Resulting histogram of linear development using DCRAW.
There are obvious differences. We can see how the information is concentrated in the lowest f-stops corresponding the whole second half of this histogram to only the last f-stop (marked as 12) which is almost empty as it only contains the highlights of the scene. The next quarter of the histogram corresponds to the next f-stop (marked as 11), and so forth up to completing the 12 f-stops we can achieve to capture using the 12-bit RAW sample file used.
We must not think that the higher concentration of information due to the linear development means we are losing tonal richness. This is not like that at all, in fact a gamma corrected histogram starts from a linear one to which a gamma correction curve has been applied and that is why a lot of holes are created in the low end of gamma corrected histograms. The tonal richness is not increased nor reduced for using one or the other kind of image.
For being the image information in a linear format, any possible linear transformation is very obvious; so the application of a white balance or exposure control become as we will see later very simple linear scaling operations over the levels.
WHITE BALANCE AND HIGHLIGHTS
As we commented before the commands to perform the white balance operation and choose the way we will process the highlights are respectively -w -a -r and -H. We will comment them in the same section for being closely interrelated. Depending on the highlights behaviour chosen, the white balance can lead to blow certain areas of the image that were not blown in the original RAW file data. This is common to all RAW developers and we will study this in detail later.WHITE BALANCE
The way DCRAW implements the white balance interface is not the usual Temperature/Tint but a lower level set of 4 multiplying factors which will scale linearly each of the RGBG image channels of the Bayer matrix (white balance is applied before demosaicing). In general factors number 2 and 4 will be the same as they correspond both to the green channel, just in different locations of the Bayer distribution.We must point that a particular white balance does not mean an absolute set of values for all those multipliers, but the relative proportions between them. In this way the same white balance can be achieved with different sets of factors as long as they keep their relative proportions.
The multipliers may have 3 different origins depending on the option used:
-w White balance is set according to camera settings at the moment of the shot
-a Automatic white balance calculated by DCRAW over the whole image
-r m1 m2 m3 m4 Custom white balance by chosing the individual multiplying factors
If none of these options is used, DCRAW will take by default a white balance preset corresponding to lighting a grey card with a standard D65 light source.
The correct linear values to be applied will vary from one camera to another. To try to guess which values are to be used to get a correct white balance is not an easy task. However it is very simple to obtain the factors that correspond to each of the camera white balance presets which is a good start point. To do this we just need to take a shot with each of the presets and develop the resulting RAW file with the -v -w commands that will display those numbers.
Find here a table of the RGB multipliers to achieve different white balance presets in the Canon 350D:
- Default (D65 lamp): multipliers 2.395443 1.000000 1.253807
- Tungsten: multipliers 1.392498 1.000000 2.375114
- Daylight: multipliers 2.132483 1.000000 1.480864
- Fluorescent: multipliers 1.783446 1.000000 1.997113
- Shade: multipliers 2.531894 1.000000 1.223749
- Flash: multipliers 2.429833 1.000000 1.284593
- Cloudy: multipliers 2.336605 1.000000 1.334642
HIGHLIGHT MODES
The -H option will decide DCRAW's behaviour concerning the highlights. We can distinguish two modes of operation according to the value range in which the white balance multipliers will be forced to be calculated:-H 0 forces at least one multiplier be equal to 1, the rest will be greater or equal to 1
-H [1-9] forces at least one multiplier be equal to 1, the rest will be less or equal to 1
IMPORTANT: whatever the values that are set with the -r command, only the relative proportions between them are kept. It is the -H command who will decide if values are taken in one range or another.
With greater or equal to 1 multipliers we will guarantee that no tone artifacts will happen due to the white balance operation. As a drawback we will be in risk of blowing partially (not all channels) or totally certain areas of the image due to saturation as we are increasing the image exposure with these values. -H 0 is the default mode if the highlight option is not set.
On the other hand less or equal to 1 multipliers will guarantee for all pixels that no channel that were not really blown in the RAW file will blow now because of the white balance scaling. The disadvantage is that depending on the -H [1-9] value chosen, we may have some colour artifacts in the areas that were originally blown in the RAW file.
All this sounds very complicated but it is not, let us take the previous example. In it with -w and -H 1 the following multipliers were generated:
Scaling with black 256, multipliers 0.586287 0.421032 1.000000 0.421032
But if we had used the option -H 0 we would get these instead:
Scaling with black 256, multipliers 1.392498 1.000000 2.375114 1.000000
Both sets of factors keep the same channel proportions (0.586287/0.421032=1.392498/1.000000) corresponding thus to the same white balance; in particular this is the Tungsten white balance preset in the 350D. But there is a clear difference in what will happen when applying them: as -H 0 multipliers are greater or equal to 1 we could blow some channels that were not in the original RAW file. Anyone who has fiddled with the Temperature parameter in ACR will have noticed that moving this control may lead to blown areas or make previously blown areas not to be blown any more. It's the same effect here.
But we must not think that for this -H 1 is always better. In fact is usually the contrary, we must use this last parameter value very carefully, and only if we are sure our image has no pixel at all blown. In that case we can use -H 1 without any undesirable effect. However everytime an image has some blown area in the RAW file (and this includes metallic reflections, light bulbs, lamps,...) this is what we would get in case of using -H 0 and -H 1 respectively:
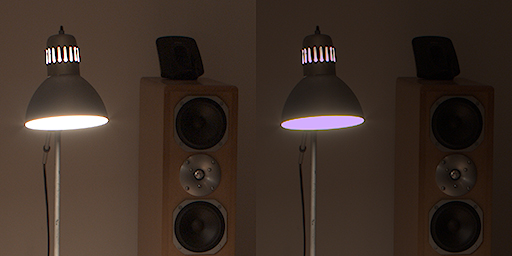
Fig. 7 Result of development using -H 0 and -H 1 respectively.
In the first image we have probably blown some channels that were not in the original RAW file, but we have preserved the white colour of the blown highlights. On the other hand, the second image because of making use of multipliers less than 1 in the R and G channels, leaving B unaltered, the proportions of those three channels in the blown areas have changed turning into an undesirable magenta cast. The phenomenon can be seen in the -H 0 vs -H 1 histograms (look at the decomposition of blown areas in three peaks in different level locations):
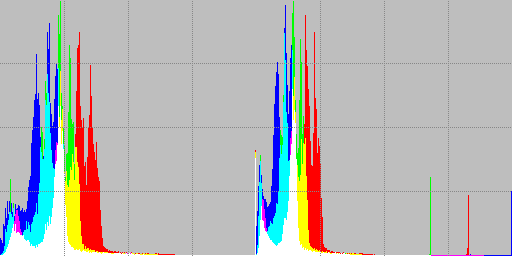
Fig. 8 Histograms obtained when developing with -H 0 and -H 1 respectively.
The -H 2 value has a similar behaviour to -H 1 as will force multipliers to be less or equal to 1, but will fix this problems by applying a slight non linear correction in the highlights to guarantee a netrual (grey) colour in the blown areas.
To finish just to point that as the white balance means a scaling of all levels by a linear factor, we will be altering their exposure, which could be adjusted with the linear exposure control we will discuss later. This is the reason why the image developed with -H 0 (greater or equal than 1 multipliers) looked brighter than the one developed with -H 1 (less or equal than 1 multipliers).
HIGHLIGHT RECOVERY
Values of -H between 3 and 9 activate different levels of highlight recovery making use of less or equal to 1 multipliers. These modes will take the tone from the non blown areas in the neighbourhood to fill the blown areas. The higher the parameter value is set, the more effort will be done in emulating the surrounding tones and less guarantee to obtain neutral (grey) tones in the burnt pixels.Following is an example of the different performance concerning highlight recovery in an image with partially blown areas in the RAW file (bright areas in the girl's skin) comparing ACR and DCRAW. While the first pushes the blown areas to neutral grey colours, in DCRAW we chose the -H 9 parameter to try to emulate the skin tones.
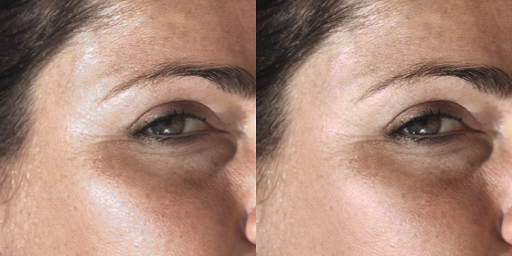
Fig. 9 Highlight recovery comparision ACR (left) vs DCRAW (right).
In this case DCRAW's strategy worked better as it imitates very well the skin tones minimising the perception of undesired shiny areas. This does not mean that DCRAW will work better in any case at all. That will depend on each case according to the characteristics of the image and its blown areas.
SENSOR SATURATION LEVEL
We commented in the introduction about the -k and -S commands for setting respectively the black and saturation levels of the sensor.It is best not to specify the black level with -k since DCRAW will calculate it much better than us from the hidden sensor pixels.
However the saturation level -S is closely related to the behaviour of the RAW developer in the highlights so it is very interesting to be able to set it since DCRAW, like any other RAW developer, will use a standard saturation value for each camera model, but this value could be unadequate for our particular unit or ISO set, or could simply be wrong in David Coffin's source code:
- If our camera saturates the RGB channels in a level lower to that considered by DCRAW we could experience magenta cast issues with effects similar to those found in Fig. 7 because of channel missalignment.
- On the other side if our camera saturates at levels higher than the standard value used we could be unnecessarily losing highlights information in the development process.
   C:\>dcraw -v -w -H 2 -4 -T portrait.cr2

   Loading Canon EOS 40D image from portrait.cr2 ...

   Scaling with darkness 1023, saturation 16224
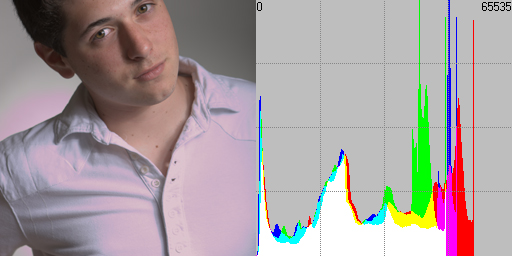
Fig. 10 Magenta cast for using of a saturation level higher than real.
We can see DCRAW for this particular 14 bits camera applies a default saturation level of 16224 that produces wrong tones in the highlights. This is because this level value is too high for the tested camera. With the -D command we can analyse the RAW file to find out exactly at which level clips this sample of 40D:
C:\>dcraw -v -D -4 -T portrait.cr2
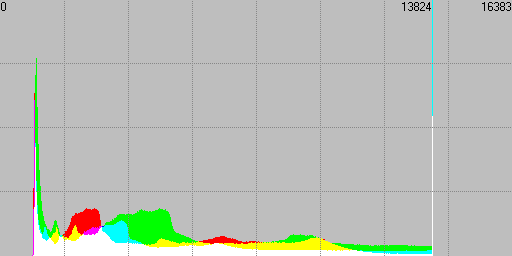
Fig. 11 Pure RAW histogram showing saturation level.
The camera under test saturates at level 13824, sensibly lower than DCRAW's default value. We develop again now making use of this new saturation level and we can see how the magenta tones disapperar without losing any information at all:
   C:\>dcraw -v -w -S 13824 -H 2 -4 -T portrait.cr2

   Loading Canon EOS 40D image from portrait.cr2 ...

   Scaling with darkness 1023, saturation 13824
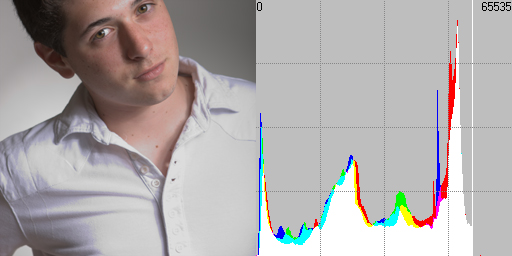
Fig. 12 Level of saturation correctly applied.
The reason for the histogram not to reach the maximum is because we made use of a white balance with lower or equal to 1.0 multipliers which guarantees that no information will get blown in the highlights producing a slight underexposure.
The point is that now DCRAW knew correctly which was the saturation level and forced a neutral tone (R=G=B) in the highlight areas thanks to the command -H 2.
Some cameras do not have exactly the same saturation point for all channels (this is pretty usual in Nikons), and some of them do not even saturate at a particular value but over a range of values (Fuji Super CCD R and Olympus files).
In these cases I have found that the correct way to proceed is to choose the lowest available saturation point, so that any higher value will be considered as saturated by DCRAW with the guarantee of neutral highlights.
For example let us take a RAW file from the Olympus E-510 with the following RAW histogram in the blown highlights:
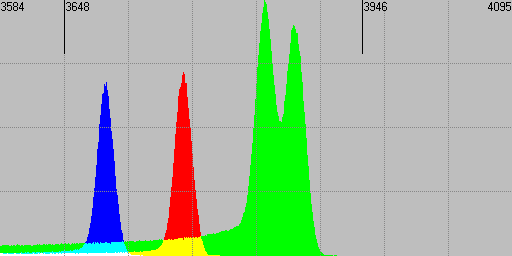
Fig. 13 Pure RAW histogram showing saturation levels.
DCRAW uses by default a saturation value of 3946 for this camera, producing slightly magenta highlights. When using a saturation point of 3648 in the development the blown areas become perfectly neutral:
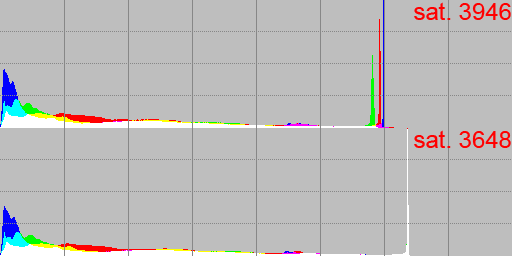
Fig. 14 Histograms after RAW development with different sat points.
Generally speaking we can conclude that when wrong tones appear in the highlight areas, typically magenta casts, is because of a software problem in the RAW development. The RAW developer used is not applying a correct saturation point and/or an appropiate neutral highlights strategy. It would not be strange that the problem disappears just by using a different RAW developer.
In the case of DCRAW the neutral highlights strategy with -H 2 works perfect, but it is quite common to find default saturation points unadequate for some cameras. For them we will have to calculate and apply it using the -S command.
To find out more about this important parameter please refer to The RAW saturation level tutorial.
PHOTOSHOP ADJUSTMENTS OF THE DEVELOPED IMAGE
Once here we should already have our RAW file developed and in 16-bit TIFF format, so it is time to get into Photoshop. When doing this PS will ask in which colour space the document must be open. If we told DCRAW to convert the data into some colour space PS will detect it and we just need to tell PS to assign that colour space. If we did not, and the TIFF file has not colour managed (option -o 0), we should tell PS to perform no colour management at all.The ideal situation however is none of these options but to have the profile of our camera, i.e. a profile generated after calibrating our own camera. In that case we would develop the RAW file withour any colour management (option -o 0), and in the file open operation we would assign our camera's own profile to it.
In the three cases the image data will be in linear format, but if we have asked DCRAW to convert it to some colour profile the program keeps some information into the TIFF file which will inform PS that the data is in linear format so it will automatically display it with a corrected gamma. On the other hand if we did not convert to any colour space the image will display tremendously dark, do not panic. To correctly visualize it we must go to Edit → Colour settings... and in the section 'Work colour spaces' choose RGB: 'Custom RGB...'. A window will pop up and in the 'Gamma' value we will introduce a 1. This will tell PS that the image has not been gamma corrected yet.
By doing this we are not altering the image data at all which remain linear exactly as DCRAW produced them. We just need to display the image's histogram to see how concentrated to the left it is.
If now we try to edit our image with curves for instance, it will be an impossible mission because of that concentration to the shadows. Unfortunately PS is not designed to do a proper linear edition, so its curves and the rest of tools do not have enough precision in the low end of a linear histogram to properly work on it. What we will be able to do now taking advantage of the linear state of the image data is:
EXPOSURE CORRECTION USING CURVES
This is a matter of having a clear concept of what digital exposure is: if our sensor is a linear device and as a result of this for every pixel it produces a level which is proportional to the amount of light captured, and our histogram is linear as well, to apply on it an overexposure of +1EV we just need to multiply by 2 all image levels; and divide them by a factor of 2 to obtain an underexposure of -1EV. To perform this operation making use of a curve is as simple as: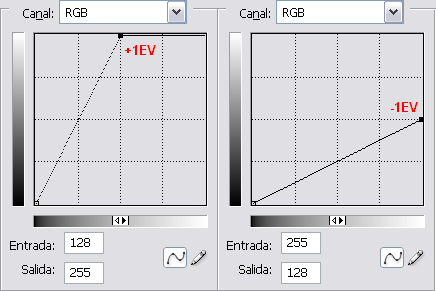
Fig. 15 Curves for exposure correction.
To overexpose by +2EV we would need a curve crossing the point (64,255), to underexpose by -2EV we would use the curve (255,64), and so forth. Of course all intermedium levels are also possible for an exposure fine tuning.
WHITE BALANCE USING CURVES
To perform the white balance operation we will make use of the same linearity principle, it is just that in this case the curves will be applied independently over each of the 3 RGB channels to model the white balance multipliers we have been talking about. To find out the curve that models some particular multiplier we just need to do the conversion of it into the 0..255 range of the curve. For example the tungsten white balance that we studied had the following RGB multipliers with -H 0: 1.392498 1.000000 2.375114, that will be modelled with an overexposure curve in the R channel crossing (255/1.392498,255) = (183,255) and another one for the B channel crossing (255/2.375114,255) = (107,255), leaving unaltered the G channel: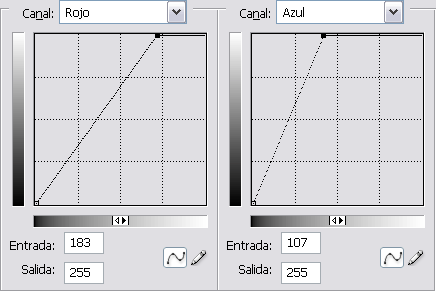
Fig. 16 Curves for white balance.
We could have used the less than 1 multipliers provided by -H 1: 0.586287 0.421032 1.000000. The curves to use in this case would be underexposure curves consisting in a R channel curve crossing (255,255*0.586287) = (255,150) and another G channel curve crossing (255,255*0.421032) = (255,107) leaving in this case the B channel unaltered. All implications we studied about the influence on using a greater or equal to 1 or a less or equal to 1 multipliers set apply now. We must not be afraid of how radical these curves are as the histogram is linear and we already saw how deeply the information concentrated to the left.
The good point of adjusting the white balance with curves is that we can set them in a adjustment layer and tune them till we get the right proportion of channels to perform a correct white balance.
Let us see an example of an imagen that was developed without applying any white balance (-r 1 1 1 1) and how it changes after being adjusted with the curves described above (move the mouse over the image to see the effect of white balance):
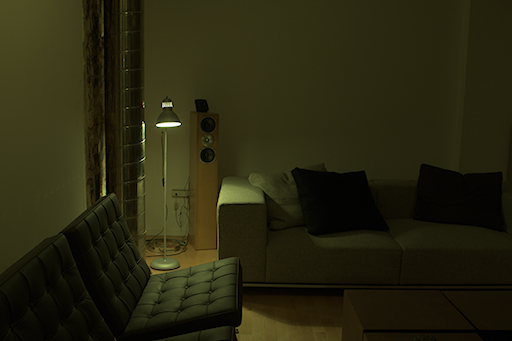
Fig. 17 Effect of white balance (move mouse over image).
Don't you think it is exciting to adjust the white balance by ourselves, knowing what is really happening to our image levels? And all this just making use of a simple curve, applying in an elegant and precise manner the theoretical concepts about sensor linearity.
Unfortunately this way of operation is more didactic than practical, because as we already indicated in the beginning to adjust the white balance after the RAW development is not recommended as demosaicing algorithms are optimised to interpolate an already white balanced image.
In the next image we will see what kind of artifacts we can expect when white balancing afterwards (move the mouse over the image to reveal the colour artifacts):
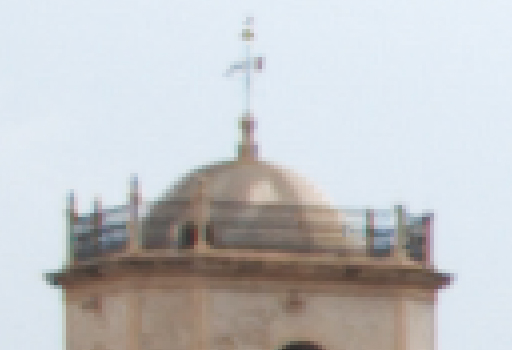
Fig. 18 White balance before vs after (move mouse over image) Bayer interpolation.
Actually the ability of adjusting the exposure, and hence white balance, using this kind of curves is not exclussive of linear images. In the article Gamma correction. DCRAW with gamma it is explained how a mathematical property of the gamma curve allows to use these curves also on non linear images, just different slope values would be needed.
This is applied in the JPEG white balance tutorial to correct the white balance on JPEG or other type of processed image files, without requiring them to be linear.
CONVERSION TO A COLOUR SPACE AND GAMMA
Once we have developed our image there is only one step more to enter the edition stage: conversion to a colour profile and gamma correction.COLOUR PROFILE
The RAW data is produced in the profile of the camera hardware, so for proper colour management of this RAW file there are two possibilities:
- We have our particular camera profile: in that case we will develop without any colour management in DCRAW with the -o 0 command and will assign the image to that profile when opening it in PS
- We can perform the conversion to the destination colour space in the development itself: we will make use in this case of the -o 1-5 colour space conversion commands.
If PS does not recognize the colour profile embedded in the image developed with DCRAW, linear versions of the most typical profiles (sRGB and Adobe RGB) can be downloaded from this link. We just have to copy them in the usual path of the ICC profiles (typically 'C:\Windows\System32\spool\drivers\color\') and assign them when opening the images into PS.
Should you wish to create your own linear version of some existing colour profile just follow these steps (sRGB was taken for the example):
- Choose 'Edit' → 'Color Settings' and check advanced mode
- Choose 'sRGB IEC61966-2.1' from the 'RGB' droplist under 'Working Space'
- Now choose 'Custom' from the same droplist at the very top. In the dialog that will pop up set 'Gamma' to 1.0 and enter an appropiate name, e.g. 'DCRAW Gamma1 sRGB', leaving all other values as they are. Press 'OK'
- Again in the 'Color Settings' dialog choose 'Save RGB' from the same 'RGB' dropdown list as in steps 2 and 3. Give an appropiate name, e.g. leave the suggested 'DCRAW Gamma1 sRGB.icc', and press 'Save'
- Close the 'Color Settings' dialog by pressing 'Cancel' in order not to choose the new profile as working space
GAMMA CORRECTION
We have seen that DCRAW generates linear images if a gamma correction is not specifically applied using the -g command. Even if linear image edition is truly possible, providing in fact some advantages over non linear edition, PS is unfortunately not well suited to support it, resulting many of its tools difficult to handle when facing this kind of images.
That is why as a previous step to edition we should also delinearize the image applying the desired gamma correction, typically of 2.2.
To perform this step we just need to convert the image to the destination colour profile (with gamma=2.2 or whatever). Remember that the image is now encoded and assigned to a linear colour profile, so if this were for instance sRGB, to convert it to a non linear version of the same sRGB (the usual one in PS) will have this delinearization effect over the image.
When doing these all levels in the histogram will redistribute shifting strongly to the right end but keeping the image display unaltered as in any colour profile conversion.
I have checked that PS (CS2) display linear images with banding artifacts in those homogeneous areas if the degree of zoom set is lower to 50%. This phenomenon just affects the image display so the real encoded information remains intact. The final conversion to a non linear colour profile causes these undesired effects to disappear.
The example shows how PS displays a linear image using a 36% zoom, and how the problem vanishes after the delinearization process is done through a conversion to gamma greater than 1.0:
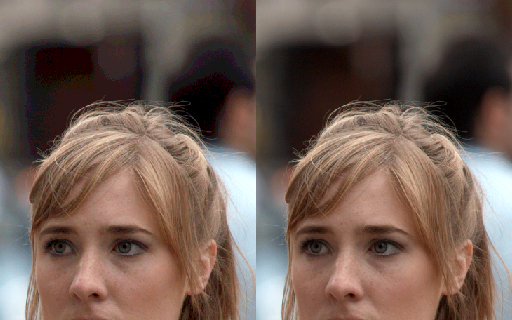
Fig. 19 Posterization effect in PS when displaying linear images (left) vs non linear (right).
Once the image has been converted to the desired non linear colour profile the edition process can start in the same way as if we had developed the image using any other RAW developer.
Of course we can save these steps by obtaining a gamma corrected output straight from DCRAW using the -g command with appropiate parameters.
ADVANTAGES OF DCRAW OVER COMMERCIAL RAW DEVELOPERS
Apart from the interpolation quality, noise reduction,... which should be studied in deep in a different analysis, we can conclude DCRAW supports a series of features that are not available on most commercial RAW developers such as ACR, and that can be very useful for certain analysis or applications:- Extract pure RAW data without applying any demosaicing or transformation process with -D
- Fast extraction of the embedded JPEG image from the RAW file with -e
- Not to apply white balance with -r 1 1 1 1 to get unbalanced channels as captured by the sensor
- Apply white balance without blowing any pixel that was not blown in the RAW data with -H 1-9
- Develop an image without performing any colour management with -o 0
- Absolutely not performing any noise reduction or unsharp mask processes by default
- Obtain a linear image with no gamma correction applied with -4
- Perform linear adjustments which would become much less obvious over a gamma corrected histogram
- Black and saturation points customised to our particular camera with -k and -S
- Different adjustable levels of highlight recovery using -H
- DCRAW does not discard border pixels while ACR does (Canon 350D: ACR=3456x2304, DCRAW=3474x2314, 1% extra surface)
- DCRAW generates true 16-bit images while ACR outputs 15-bit files (half the levels)
- Moreover DCRAW is free, concise (<500KB), multiplatform and continuously updated
RAW FORMATS SUPPORTED BY DCRAW
The list is endless and is continuously being updated making of DCRAW a universal RAW dictionary that can even read some RAW formats found on compact cameras not documented by the vendor.It is usual that when a new camera appears on the market, David Coffin updates DCRAW before any other vendor is giving support to the new file format. Only this is a good reason to take DCRAW into account in the time a new version of your favourite RAW developer appears.
On this camera listing all supported formats can be found.
MAKING USE OF DCRAW IN WINDOWS EASY
DCRAW SCRIPT FOR WINDOWS
To avoid having to use the command line and save time when developing files with DCRAW, it is recommended to assign DCRAW into the options of Windows Explorer so that when doing Right mouse → 'Send to' DCRAW appears as one of the choices. To do that this simple script can be used:
   @echo off

   :begin

   if _%1_==__ goto end

   echo Processing %1...

   c:\windows\dcraw -e %1

   shift

   goto begin

   :end
We will save it with some easy to identify name such as dcraw.bat in 'C:\Documents and Settings\user\SendTo' for Windows XP, or in 'C:\Users\user\AppData\Roaming\Microsoft\Windows\SendTo' for Vista users, where user is our usual Windows username.
To locate the second pathname in the user friendly Vista, it can be necessary to enter in the 'Run' box (left Win + 'R') the string '%USERPROFILE%\AppData\Roaming\Microsoft\Windows\SendTo' that will take us to the correct path.
In order to see the 'SendTo' folder, it is possible that we have to enable in Tools → Explorer Options the checkbox 'Show all hidden files and folders', this option can be restablished later once the script has been copied.
Once the script is saved we just have to select with the mouse a RAW file or group of files, and with the right button send them to the script. Of course we can define several scripts with different development options each (in the example above we did not develop the RAW file, just extracted the embedded JPEG thumbnail associated).
CONSOLE FROM WINDOWS EXPLORER
By installing the minimal tool: MS-DOS.reg in the Windows register, we can open very easily a console associated to any path just by right clicking on any folder in the Windows Explorer and chosing the option 'Consola sistema'.In that way, to process any RAW file found in a complicated route with DCRAW, we will not need to perform any folder change from the console with the cd command. We will be able to open a terminal console directly associated to the chosen pathname in the explorer.
PERFECT RAW. GRAPHICAL INTERFACE FOR DCRAW
In order to avoid the tricky text interface when using DCRAW from the command line, Manuel Llorens, Fernando Ariznavarreta, Egon and me (they are much more involved than me myself) are developing our own RAW developer based on DCRAW but with a powerful graphical interface: Perfect RAW.The concept is a bit different to existing front end applications for DCRAW such as UFRAW, as our main priority is precision and control over the development process so that none of DCRAW's facilities is hidden to the user, even if that makes Perfect RAW a not so simple or quick RAW developer as others.
In addition to this we are adding new functions not found in DCRAW such as high precision histograms (including log histograms displaying f-stops), exposure control with the possibility of highlight preservation, new algorithms to improve image quality,...
For more information about the development of this project click the following link: Perfect RAW.
NOTE: unfortunately, Perfect RAW's team leader Manuel Llorens, has decided on 24 Feb 2010 that the project is officially suspended. To know more about the situation of the project he can be contacted on his site RAWness. Digital Photography Science.
If this content has been useful to you, please consider making a contribution to support this site. Keeping it means an important effort, so as considerable storage space and bandwidth in the server. It is a simple and totally secure operation.
gluijk@hotmail.com