MAKE
CAMERA
DISPLAY
RELIABLE
Created
7 Jan 2008
Updated
7 May 2016
INTRODUCTION
It is well known how useful is looking at the histogram and the clipping information warning that our cameras provide. Specially if we are exposing to the right, taking a look on them is very interesting and almost mandatory.Unfortunately the histogram and clipping information displayed by our cameras is not directly related to the RAW file as it would be desirable, since this will be the source of all our image postprocessing. They refer instead to the JPEG generated by the camera, no matter if we are in RAW only or RAW+JPEG mode.
Of course there exists a strong correlation between the level of exposure of this JPEG file and the underlying RAW, but the truth is that the development processes, with critical level modification actions such as:
- White balance
- Application of a contrast curve
- Saturation chosen by the user
- Colour profile conversion and gamma correction
This is what some authors erroneously call "the amazing information recovery capabilities of the RAW", when the information was always there and it was just the camera that destroyed it in its inner development to build the JPEG. To see a real example of the exposure correction capabilities of the RAW please have a look at the article RAW exposure correction.
All this means that if we check that the camera does not display any trace of saturation we will be sure that no highlight information was lost but, it is also very likely that we could have exposed between 1 and 1.5 extra f-stops without loosing any information, which means we did not achieve the optimum exposure to the right.
Until camera vendors start to think that there are a lot of RAW shooters willing to precisely know if their information was clipped, there is no other way than adopting a conservative attitude and try to stablish the relation between the information displayed by the camera and the expected level of exposure in the RAW file.
To minimise the differences between both sources of information we can configure our camera with neutral parameters in terms of contrast, saturation, even sharpness,... so that both versions of the image get closer. These adjustments will however mean a limited improvement in the camera histogram reliability.
In this article we are going to propose a direct strike against the least accesible step in the RAW development chain, that will however be the most decissive in defining the levels of the JPEG file created in the camera meaning partial saturations (generally in the red channel) of more than 1 f-stop in many situations. We are talking about cancelling the white balance.
A few days after publishing this article I knew that Iliah Borg, a regular participant in the Nikon DPreview forums, had already investigated the way to cancel the white balance on Nikon cameras. In them the user can directly load the white balance coefficients, being this technique named by him as 'UniWB' (Unitary White Balance). In fair credit to his contribution I will keep the same name to designate the procedure valid for any camera that is presented here.
A BIT OF THEORY ABOUT WHITE BALANCE
We will see what white balance consists of from the point of view of the camera and the RAW development.In its final implementation white balance is just a linear scaling of the RGB channels of the RAW file. This means that the levels of some channels, typically read and blue, are multiplied by a factor greater than 1.0 that scales them to compensate for the different sensitivities of the sensor, and also for the light casts present in the scene that will depend on the type of light (daylight, tungsten, shadows,...).
So, even if in the last place white balance can be presented to the user as a Temperature/Tint pair, in practice it is just and overexposure of some of the channels of the RAW file by some multiplying factor.
Such an obvious fact can easily produce partial saturation of the image according to the white balance chosen. It is usual to find linear factors in the range of 2 or 2.5, that would be increasing exposure in the affected channel in 1EV or 1.3EV respectively.
The multipliers corresponding to my Canon 350D presets are shown here to have an idea of their magnitude:
- Tungsten: multipliers 1.392498 1.000000 2.375114
- Daylight: multipliers 2.132483 1.000000 1.480864
- Fluorescent: multipliers 1.783446 1.000000 1.997113
- Shade: multipliers 2.531894 1.000000 1.223749
- Flash: multipliers 2.429833 1.000000 1.284593
- Cloudy: multipliers 2.336605 1.000000 1.334642
Along this article I will make references to the term "developing without applying any white balance". This is something at the moment only DCRAW can achieve and corresponds to a RAW development where, ignoring the metadata white balance information found in the RAW file, we force the developer to obtain an image using multipliers 1.0 in the 3 channels. This is the way to "see as the camera sees".
PROCEDURE TO CANCEL WHITE BALANCE APPLIED IN THE CAMERA JPEG
All the problem is about necessarily having to choose some white balance in our camera. There is actually no need for that, and cameras could just allow to cancel any white balance at user's request when building the display information. But we will not debate about something that cannot be changed at the moment.White balance has to be necessarily applied in building the JPEG, in Auto mode, using some white balance preset, or... through a user custom white balance. And this is the backdoor we will use to "kill" white balance.
The custom white balance mode is normally used to shoot at a neutral grey card, telling the camera to make white balance arrangements so that the colour of the card reaches a neutral grey, just to eliminate colour casts due to the scene lighting making the objects appear in their real colour.
What we are going to do instead is to calculate the particular colour for this card that will automatically provide a neutral grey without applying any white balance. In other words: we are going to calculate the exact colour that our camera "sees" as a neutral grey (R=G=B channels).
If the camera sees some particular colour card as neutral grey, and we use a card of that colour as a reference to define the custom white balance, what multipliers will be calculated by the camera to take that card to a neutral grey? obviously 1.0, 1.0 and 1.0. This means it will calculate a neutralised white balance that will actually perform no scaling, leaving the three channels unaltered.
If now we shoot using this white balance setting, the JPEG calculated will display with the same appearance as the camera actually sees the scene (we will find this is more greenish than Incredible Hulk), but in compensation we will achieve a histogram and highlights clipping warning that will have not suffered any scaling because of the white balance and will then be much closer to the real RAW condition. The camera will not be conservative any more and we will be able to trust much more precisely the information it provides when calculating exposure.
METHODOLOGY PROPOSAL
TEST CHARTWe do not know which colour is "seen" as neutral grey by our camera, this means we do not know the exact RGB proportions that produce neutral R=G=B levels in the RAW file, so we will have to test different combinations until we reach the right RGB ratio.
All RGB colour proportions (which is not the same as all RGB possible combinations) that can be achieved with three channels only have two degrees of freedom, so we can fix one channel and test different combinations for the remaining two until reaching the one seen by the camera as neutral grey.
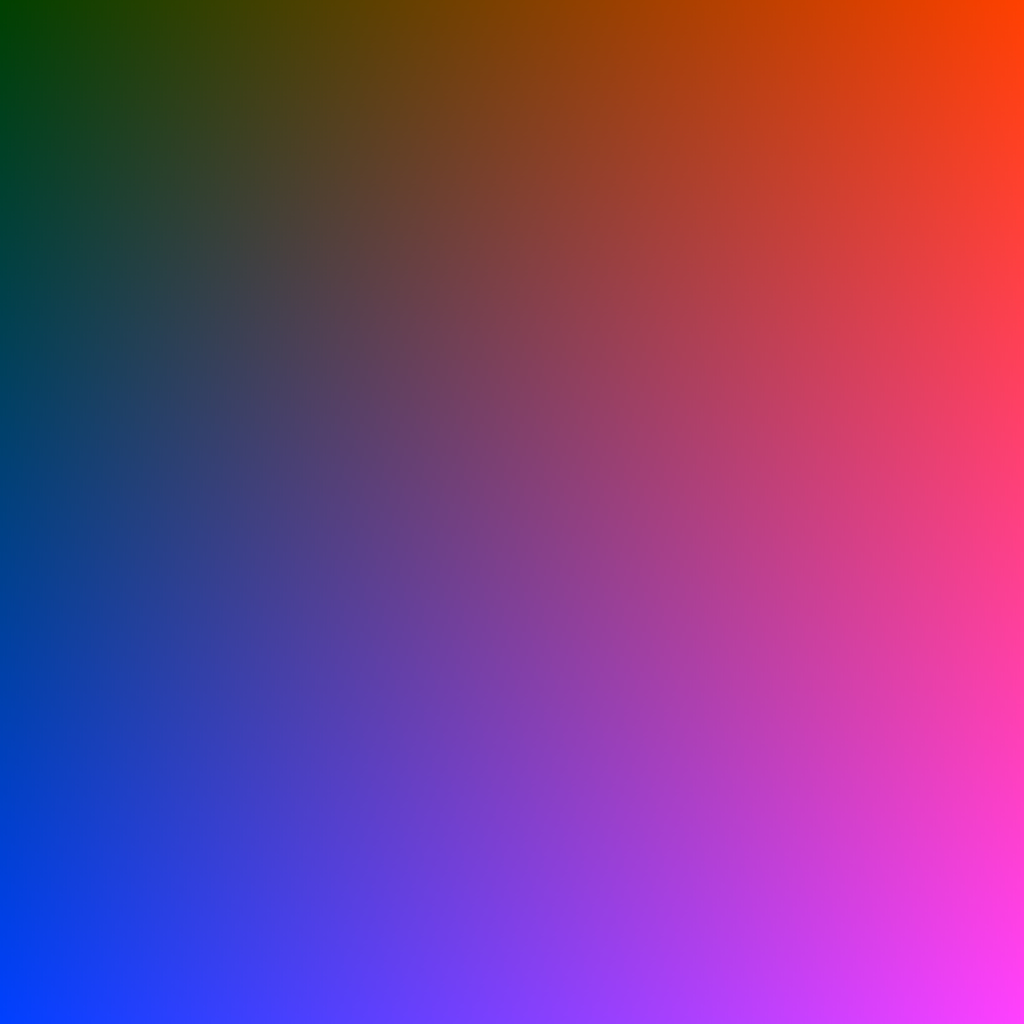
We will be cleverer than this. To be able to test all possible proportions in a single shot we will create a progressive colour chart where one of the channels is constant. I chose the G channel, making R and B channels loop through all possible values between 0 and 255. In this way we will have all possible proportion combinations between channels in the chart.
In particular I chose a value of 64 for the G channel, 25% of the maximum available, because experience tells us that cameras have more sensitivity in that channel so any combination that the machine can see as neutral grey must be poor in green. The R channel takes values 0 to 255 left to right, and the B channel does the same top to bottom. This is what the test chart looks like:
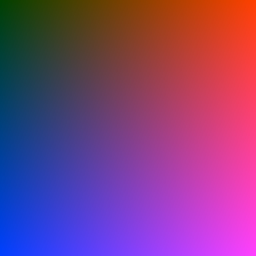
Fig. 1 Test chart with all possible channel proportions.
For those willing to make tests with the chart it can be downloaded in 1024x1024 pixels size from UniWBChart.jpg.
I calculated the hue distribution of this chart, the representation of colour ignoring lightness information. It is easy to see that the consequence of chosing a low value for the G channel is that we are focusing in evaluating hues rich in red and blue, making greenish tones spread less in the chart:
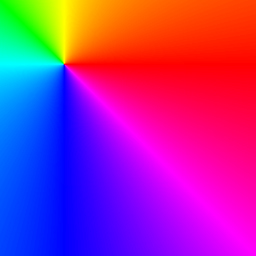
Fig. 2 Hue distribution in the test chart.
Now we will shoot the test chart displayed on the computer screen. It is convenient to maximise the size of the chart in the frame, but always taking care not to cut any part of it. The shot will be done as horizontally and vertically balanced as possible and with a soft defocuss not to capture the screen texture; this is specially recommended on CRT monitors.
Then we will develop the obtained RAW file without applying any white balance at all. This can be done with the DCRAW command:
dcraw -v -r 1 1 1 1 -TOn the TIFF image produced, we must look for the precise point coordinates where our camera sees a perfect neutral grey.
To perform more easily this step I have cropped the chart with the 'Crop' tool in Photoshop activating the perspective correction. In this way we just need to set the four corners of the chart and PS will not only crop it but will correct it into a rectangular format. Next we will rescale it to 256x256 pixels size resulting the following image:
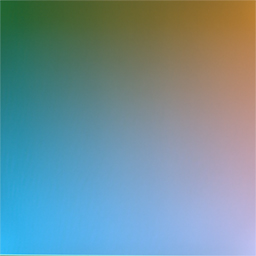
Fig. 3 Test chart shot developed without white balancing.
This is the way our camera "sees" the test chart in Fig. 1. Each part of it is interpreted in colours different to the original because of the different channel sensitivities of the sensor.
CALCULATING THE HUE OUR CAMERA "SEES" AS NEUTRAL GREY
In Fig. 3 is very difficult to distinguish where the neutral grey is located, so we will do a hue and saturation analysis.
This analysis can easily be done in Photoshop. However I preferred to use a simple and effective tool that allows to see an image in different colour models: RGB, HSV, HSL and CMYK called ShowImage. This is the result:
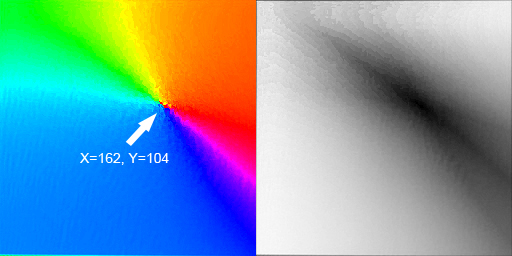
Fig. 4 Hue (left) and saturation (right) of test chart developed without white balancing.
It is easier to identify the neutral grey as the point where all hues intersect rather than looking at the saturation distribution.
The general "coarseness" of these samples is because of the presence of noise in the test chart, which was difficult to notice in Fig. 3 but affects more to the hue precision.
In the way the test chart was designed, where R takes values 0 to 255 according to the X axis and B does the same in the Y axis, we can obtain the R and B levels corresponding to the hue seen as neutral by the camera just by checking the geometrical position of the neutral grey in the resulting capture.
So we measure over the hue distribution the coordinates that locate the neutral hue, obtaining that the R and B levels seen as grey by the camera are R=162 and B=104 since this is the position indicated by X=162, Y=104 in the chart rescaled to 256x256. Remember that we decided to set G to G=64.
GENERATING THE "MAGENTA CHART"
Now we just need to build the colour chart that is seen straight by the camera as neutral grey with the calculated channel values. It will be a chart of uniform colour defined in the tested camera by proportions: R=162, G=64 y B=104.
The result is what we could call a "magenta chart" or whine chart looking at its appearance. It corresponds to the hue that appeared in Fig. 1 in the exact position indicated by the arrow in Fig. 4:

Fig. 5 Magenta chart that the camera sees as neutral grey.
Now we will check that this chart is actually seen by the camera as neutral grey when no white balance is applied. We shot over the chart, and this is very important: with exactly the same lighting conditions as we had when shooting the test chart, and again we develop without applying any white balance. The logarithmic histogram and hue achieved are displayed here:
Fig. 6 Logarithmic histogram of the magenta chart without white balancing.

Fig. 7 Hue generated in the magenta chart shot.
The result is totally satisfactory. Without performing any white balance we obtained a neutral grey with a very low channel alignment error, which means that we calculated precisely the hue that our sensor "sees" as neutral grey.
Shooting at charts displayed on the computer screen could seem not very rigurous but it absolutely is. To proceed in this way instead of printing the chart does not invalidate the prcedure at all as long as the magenta chart is shot exactly under the same conditions (monitor adjustments and environment lighting) as the test chart, because all chromatic deviations that could affect the first shot will be the same we will have in the second one so one error will compensate the other.
So the monitor does not need to be calibrated (mine is not), and the environment lighting can be any as long as it remains constant in both shots. Shooting at the monitor screen we will be more precise and will save time and ink!.
CONFIGURING THE CUSTOM WHITE BALANCE
Now we just need to use the RAW file containing the magenta chart, which will already be into the camera memory card, to configure the custom white balance. We go to the corresponding menu option and tell the 350D we want to use that RAW file as the reference source for white balance.
In this way the 350D will calculate the needed multipliers to take the magenta chart to a neutral grey, but since the sensor natively captured that chart in a neutral grey hue, the multipliers calculated will be very close to 1.0 which was our goal.
We can check it very easily. After configuring the new white balance we shot at anything making use of it, and the RAW resulting from this test shot is developed with DCRAW using camera white balance so that it informs us about the multipliers corresponding to the RAW metadata:
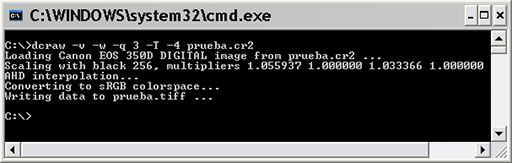
Fig. 8 Multipliers of custom white balance.
This means the multipliers for the three channels are: R=1.056, G=1.000, B=1.033, so the maximum deviation was 5.6% in the R channel, which is very acceptable specially if we take into account that the R channel is normally scaled for white balance by 2.0.
This is what the camera JPEG looks like with the calculated white balance not to balance anything. It has a greenish appearance typical of the way the sensor actually captures real world scenes:
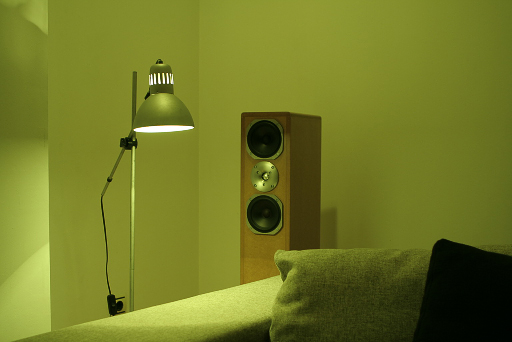
Fig. 9 JPEG image displayed in the camera.
Of course this is not a valid method if your customer is sitting beside you asking to see every single shot, but keeping the appearance of the JPEG was not our goal. When shooting RAW the appearance of the image in the camera display is highly irrelevant in terms of colour.
UNIWB RAW FILES DOWNLOAD
For those who have any of the following cameras and wish to download the RAW files with which to configure the null white balance, here they are with the highest deviation channel informed in %:
- UniWBG9.cr2 (RGB: 0%) by Manuel Palma
- UniWB300D.zip (B: 0.23%) by Alexandre Istratov
- UniWB350D.cr2 (R: 0.69%) by Guillermo Luijk
- UniWB400D.cr2 (B: 0.098%) by Antonio Marín
- UniWB450D.zip (B: 6.2%) by Michel Teurlay from Canonistas
- UniWB500D.cr2 (RGB: 0%) by Fernando Boro
- UniWB550D.cr2 (RGB: 0%) by Sebastián Santos
- UniWB20D.cr2 (B: ~10.7%) by Gabor Schorr from LL
- UniWB30D.cr2 (B: ~10.5%) by José Luis Caballano from Canonistas
- UniWB40D.cr2 (R: ~6.97%) by Gabor Schorr from LL
- UniWB50D.zip (G and B: ~0.096%) by Anton Txu de Canonistas
- UniWB5D.cr2 (R: ~2.31%) by Bernie West from LL
- UniWB5DMkII.zip (R: ~2,2%) by Roberto Barrios
- UniWB7D.cr2 (RGB: 0%) by Susana Portela
- UniWB1Ds.cr2 (G: ~14.4%) by Jonathan Wienke from LL
- UniWB1DMkII.cr2 (B: ~14.0%) by Jonathan Wienke from LL
- UniWBD60.nef (B: 0.78%) by Hartmut Schmidt
- UniWBD90.nef (R: 3.9%) by Javier Collado
- UniWBD5000.zip (R: 1.56%) by Arie Wolfert
- UniWBD7100.zip (R: 1.56%) by Arie Wolfert
- UniWBD300.nef
- UniWBD600.nef (R: 0.78%) by Tamás Bölcsvölgyi
- UniWBD700.nef by Miguel Ángel Agustín Fonfría from the UPV
- UniWBD750.nef (G: 1.02%) by Simone Carlo Surace
- UniWBD800.nef (R: ~1.2%) by Markus Felix
- UniWBD4.nef (R: 1.56%) by Steven Bruinen
To load the previous UniWB RAW file into the camera, it is necessary to previously rename it to some valid name. To do that the simplest way is to do a normal shot with the camera set in RAW mode using an empty memory card. Next we will replace the file saved by the camera in the memory card for the one downloaded here, renaming it previously to the exact name generated by the camera. In this way there will be no compatibility problems with the numerical sequence or filenames generated by the particular camera.
Anyone trying the procedure and achieving multipliers close to 1.0 (let us say with a deviation lower than 10%), or manages to improve the previous deviations, please send them to me to add the files to this list.
QUICK METHOD FOR OBTAINING THE UNIWB
There is a way to easily and precisely obtain the UniWB without the need of doing all the process explained.The philosophy of the procedure is to find a scene that shot by the camera produces already white balanced RAW data, i.e. that accomplishes with R=G=B in every pixel. What happens if we shoot making sure we saturate all three channels in all pixels? we will have a totally blown RAW file but also an already balanced since all pixels will have the same value, that of saturation.
This idea was introduced but a POTN forum member. I have tried it on my Canon 350D and it works fine, obtaining in just a second a RAW that provides a custom white balance with more precise multipliers than those I obtained with the magenta chart: R=1.006856, G=1.000000, B=1.005877, i.e. the maximum error was in channel R and only 0.69%.
The downloadable RAW file for the Canon 350D is this, although there is no excuse now for everyone trying to get their own file. The steps would be:
- Shoot at some brilliant source of light for a couple of seconds, so that all three channels get blown in all pixels
- Use the resulting RAW file that will be in the memory of the camera to set custom white balance
- The precision of the UniWB achieved can be checked by shooting at anything with the new white balance, and looking at the multipliers displayed by DCRAW when developing the resulting RAW with the camera white balance: dcraw -v -w
This is why if the quick method is used we need to check the precision of multipliers with DCRAW to make sure it is correct.
If this content has been useful to you, please consider making a contribution to support this site. Keeping it means an important effort, so as considerable storage space and bandwidth in the server. It is a simple and totally secure operation.
gluijk@hotmail.com